How to Winterize a Lawn Mower: A Complete Step-by-Step Guide for Cold Weather Care
When the grass stops growing and temperatures drop, your lawn mower needs the same attention as any other engine-powered tool. Learning how to winterize lawn mower properly not only extends its lifespan but also ensures it starts easily when spring returns. Neglecting this process can lead to rust, stale fuel, and costly repairs.
In this detailed guide, we’ll walk through every step of winterizing a lawn mower, explain why fuel stabilizer is essential, and cover special considerations for zero-turn mowers. Whether you own a push mower, riding mower, or a commercial-grade machine, these tips will help protect your investment all winter long.
Why Winterizing a Lawn Mower Matters
Before storing your mower for several months, it’s critical to prepare it for inactivity. Without proper winterization, leftover fuel can degrade, carburetors may clog, and moisture can cause internal corrosion. Following the right procedure prevents:
- Fuel system damage from ethanol-blended gas
- Battery drain and electrical corrosion
- Rust formation on metal parts
- Hard starts in spring due to stale fuel and oil breakdown
Simply put, a few hours of preparation today can save you time, frustration, and repair bills later.
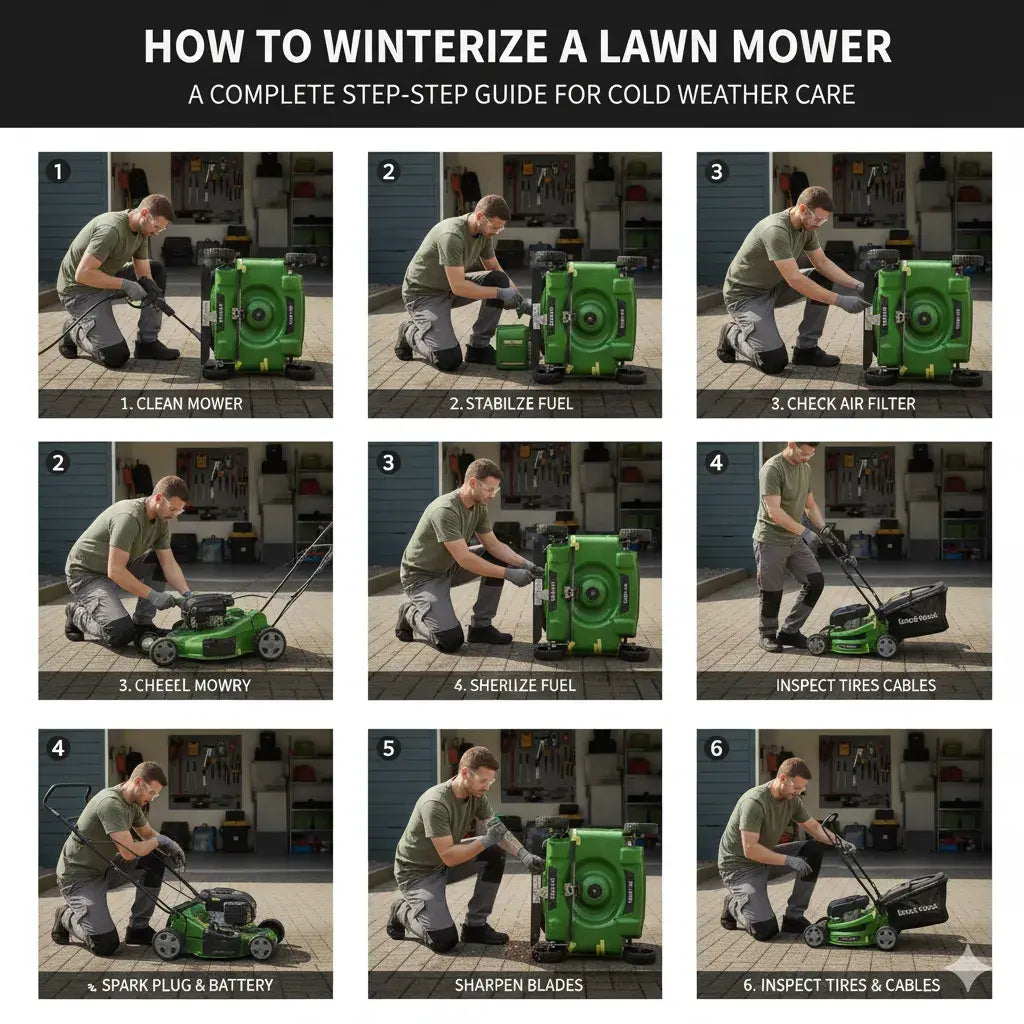
Step 1: Clean the Mower Thoroughly

Start by cleaning your mower from top to bottom. Dirt, grass clippings, and moisture can cause corrosion and clog important parts.
- Disconnect the spark plug for safety.
- Use a garden hose or pressure washer to rinse off the deck, wheels, and blades.
- Scrape off any built-up grass under the deck using a plastic scraper or putty knife.
- Allow the mower to dry completely before continuing.
For a deeper clean, apply a light layer of silicone spray or WD-40 to metal components to prevent rust over the winter.
Step 2: Change the Oil and Replace the Filter

Changing the oil before storage is essential because old oil can contain contaminants that damage the engine.
- Warm up the engine briefly to loosen the oil.
- Drain the old oil into a suitable container.
- Replace the oil filter if applicable.
- Refill with the manufacturer-recommended oil grade.
If you’re using a Kohler engine or another premium brand, check your owner’s manual for the correct oil type and quantity. Proper lubrication ensures the engine’s internal parts remain protected throughout winter.
Step 3: Handle the Fuel System — Add Fuel Stabilizer
One of the most important steps in how to winterize lawn mower maintenance is treating your fuel. Unstabilized gasoline begins to break down after 30 days, leaving behind sticky varnish and gums that clog your carburetor.
Using a Winterize Lawn Mower Fuel Stabilizer
- Add the recommended amount of fuel stabilizer to a nearly full tank of fresh gasoline.
- Start the engine and let it run for about 5–10 minutes to circulate the stabilized fuel through the system.
- Turn off the mower and top off the tank to minimize air space, which helps prevent condensation.
Alternatively, if you prefer dry storage, you can drain the fuel tank completely and run the mower until it stalls. Either method works, but using stabilizer is easier and preserves seals and gaskets.
Step 4: Replace or Clean the Air Filter

A clogged air filter can restrict airflow and cause poor performance later.
- For paper filters, replace them entirely.
- For foam filters, wash with warm soapy water, dry completely, and lightly oil them before reinstalling.
Doing this now ensures your mower breathes clean air when it’s time to mow again.
Step 5: Check the Spark Plug and Battery

Inspect the spark plug for wear, carbon buildup, or corrosion. If it’s dirty, clean it with a wire brush or replace it with a new one.
To prevent accidental startup during maintenance, keep the spark plug wire disconnected until you’re done.
If your mower has a battery (as in most riding and zero-turn mowers), disconnect it and store it indoors in a cool, dry place. Periodically charge it every month to maintain voltage.
Step 6: Sharpen and Balance the Blades

Winter is the perfect time to service your mower blades. Dull blades tear grass instead of cutting it cleanly, which stresses the lawn in spring.
- Remove the blade carefully using a wrench.
- Sharpen both edges with a file or grinder, following the original angle.
- Check the balance by hanging it on a nail — if one side dips, file a bit more until balanced.
- Reinstall the blade securely.
Balanced blades reduce vibration and prolong the life of your mower bearings.
Step 7: Inspect Belts, Cables, and Tires

Before storage, check belts for fraying, cables for wear, and tires for proper inflation. Correcting these issues now means your mower will be ready to go next season.
Lubricate pivot points and control cables with a light oil to prevent rust and freezing.
Step 8: Store the Mower Properly

Once all maintenance tasks are complete, store your mower in a dry, covered area such as a garage or shed.
- Avoid leaving it outside under a tarp, which traps moisture.
- Elevate the mower slightly to prevent flat spots on tires.
- Cover it with a breathable fabric cover to keep dust off.
If you live in a region with extreme cold, consider removing the battery and storing it indoors.
How to Winterize a Zero Turn Mower
The process for how to winterize zero turn mower models is similar but with a few key differences:
- Clean the deck and hydraulic system area thoroughly to prevent grass buildup.
- Check and top off hydraulic fluid levels as per manufacturer instructions.
- Inspect belts, pulleys, and steering arms for tension and wear.
- Grease all fittings and moving parts.
If equipped with dual fuel tanks, stabilize or drain both.
Zero-turn mowers often have larger engines and more complex systems, so taking the time to inspect each part ensures trouble-free operation in spring.
For a detailed step-by-step guide specifically for zero-turn mowers, check out our Zero-Turn Mower Winter Tips.
Bonus Tips for Winterizing a Lawn Mower
- Label your fuel can if you mix stabilizer, to avoid accidental misuse.
- Use fogging oil in the cylinder for extra protection on long storage periods.
- Keep a maintenance log noting the date of service and products used.
- Replace worn tires or seat covers before spring rush begins
Small preventive actions now will make the first mow of the year quick and effortless.
Common Mistakes to Avoid When Winterizing
Even experienced owners can make these common errors:
- Forgetting to run the mower after adding stabilizer.
- Leaving the mower outside without a cover.
- Storing with half a tank of fuel, which promotes condensation.
- Ignoring dirty oil or a clogged air filter.
Avoiding these pitfalls ensures your mower remains in peak condition throughout the off-season.
Spring Startup After Winter Storage
When spring arrives, your mower will be nearly ready to go. Just remember to:
- Reconnect the spark plug and battery.
- Check oil and fuel levels.
- Inspect belts and blades once more.
- Start the mower and let it run for a few minutes before use.
If you followed these winterizing lawn mower steps, your mower should start quickly and run smoothly.
Final Thoughts
Now that you know how to winterize a lawn mower, you can confidently prepare your equipment for storage each year. Taking these steps prevents costly damage, ensures better performance, and keeps your mower in top condition for seasons to come.
If you’re maintaining a mower powered by a Kohler engine or any premium engine brand, following proper winterization guidelines is even more critical — these engines perform best when cared for correctly.
Ready to get your mower winterized? Gather your supplies, follow this checklist, and give your machine the attention it deserves. Come spring, you’ll be rewarded with an engine that starts on the first pull and a lawn that looks its best.